

Learn how to grind garage floor for epoxy in simple steps. Master diamond grinding, concrete profiling, and safety for a lasting finish!
Have you ever seen an epoxy garage floor peel off in giant, rubbery sheets just six months after it was applied? It is a total nightmare. Most people think epoxy failure happens because of cheap paint or bad weather. But here is the dirty secret: 90% of all floor coating failures happen because of bad surface preparation.
If you want a garage floor that looks like a high-end auto showroom and lasts for decades, you cannot just sweep the concrete and start painting. You need to open up the pores of the concrete so the coating can grip it tight.
Learning how to grind garage floor for epoxy using mechanical diamond grinding is the single best way to guarantee a bond that never lets go.
In this complete guide, we will walk you through the entire surface prep process. We will cover tool rentals, diamond choices, safety gear, hands-on grinding techniques, crack repairs, and post-grind testing. Let us jump right in and get your floor ready for a bulletproof transformation!
Concrete Surface Profiling (CSP): Why Diamond Grinding Beats Acid Etching
Why can’t you just roll epoxy onto smooth concrete? Think of smooth, troweled concrete like a sheet of polished glass. If you pour paint onto glass, it sits on top. As soon as you drive a hot car tire over it, the paint pulls right off. Concrete needs texture so resinous coatings can bite into the surface.
CSP 2 to CSP 3 Standards for Resinous Coatings
In the industrial coating world, pros measure surface roughness using a scale called Concrete Surface Profile (CSP). Created by the International Concrete Repair Institute (ICRI), this scale runs from CSP 1 (glassy smooth) to CSP 9 (rough, chipped concrete).
For standard DIY high-build epoxy or polyaspartic coatings, you need a CSP 2 to CSP 3 profile.
What does a CSP 2 feel like? Touch a piece of 60-grit sandpaper. That coarse, gritty texture is exactly what your garage floor should feel like after grinding. The microscopic ridges give the liquid epoxy room to flow into the concrete pores, creating a mechanical anchor as it cures.
| Profile Rating | Surface Texture | Best Coating Application |
| CSP 1 | Smooth (Acid Etched) | Thin-film sealers only (Not Epoxy) |
| CSP 2 | Medium (60-Grit feel) | Standard High-Build Epoxy Coatings |
| CSP 3 | Coarse (30-Grit feel) | Heavy-Duty Polyaspartic & Basecoats |
| CSP 4 to CSP 6 | Extremely Rough | Heavy Mortars & Self-Leveling Screeds |
The Hidden Hazards & Limitations of Acid Etching
You have probably seen those cheap DIY epoxy kits at home improvement stores. Most of them come with a small bag of muriatic acid or citric acid crystals. The instructions tell you to mix it with water, scrub the floor, and rinse it off. Sounds easy, right?
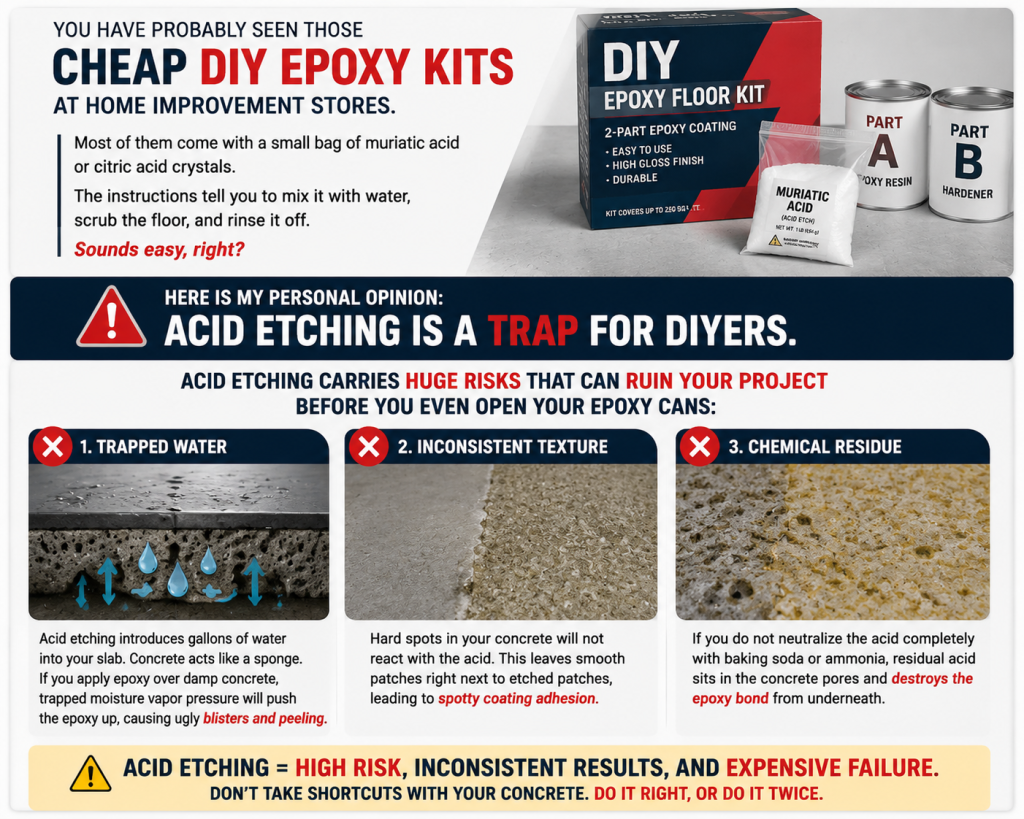
Here is my personal opinion: acid etching is a trap for DIYers.
Acid etching carries huge risks that can ruin your project before you even open your epoxy cans:
- Trapped Water: Acid etching introduces gallons of water into your slab. Concrete acts like a sponge. If you apply epoxy over damp concrete, trapped moisture vapor pressure will push the epoxy up, causing ugly blisters and peeling.
- Inconsistent Texture: Hard spots in your concrete will not react with the acid. This leaves smooth patches right next to etched patches, leading to spotty coating adhesion.
- Chemical Residue: If you do not neutralize the acid completely with baking soda or ammonia, residual acid sits in the concrete pores and destroys the epoxy bond from underneath.
Mechanical diamond grinding skips the water, skips the chemical mess, and gives you a uniform profile every single time.
Diagnostic Tests Before You Grind
Before you head down to the local tool rental shop to grab a grinder, you need to run two quick tests on your bare slab. Skipping these diagnostic steps is like building a house without checking the foundation!
- Tests concrete matrix hardness
- Determines soft or hard diamond tooling
- Checks substrate moisture levels
- Prevents vapor-related delamination
The Mohs Hardness Test: Soft vs. Hard Concrete Matrix
Did you know that not all concrete is the same hardness? Concrete hardness is rated on the Mohs scale from 1 (soft like talc) to 10 (hard like diamond). Most garage floors land between 3 and 7.
Why does this matter? Because diamond tooling works on an “opposites attract” rule:
- Hard Concrete needs Soft-Bond Diamonds: Hard concrete dulls diamonds quickly. A soft metal matrix wears away fast, constantly exposing fresh, sharp diamonds to cut the glass-like surface.
- Soft Concrete needs Hard-Bond Diamonds: Soft concrete is very abrasive. If you use soft-bond diamonds on soft concrete, the machine will chew through $300 worth of diamond tooling in less than ten minutes!
You can buy a cheap Mohs scratch test pick kit online. Scratch your bare concrete with the picks. If a #3 pick scratches the surface easily, you have soft concrete. If it takes a #6 pick to leave a mark, you have hard concrete. Matching your diamond bond to your concrete hardness saves you time and heaps of money.
Substrate Moisture Testing (ASTM D4263)
Moisture is the quiet killer of garage floor coatings. Ground moisture underneath your home travels up through the porous concrete. If that moisture cannot escape into the air because an epoxy barrier blocks it, the vapor pressure pops the coating right off the stone.
You can run a simple, low-cost moisture test using the ASTM D4263 plastic sheet method:
- Cut a 2-foot by 2-foot square piece of clear heavy-duty plastic sheeting.
- Tape all four edges flat to your garage floor using duct tape. Make sure the seal is airtight.
- Leave the plastic taped down for a full 24 hours.
When you peel the plastic back, look closely at the concrete and the underside of the plastic sheet. Is the concrete darker than the surrounding floor? Are there tiny water droplets under the plastic?
If you see moisture, your slab is breathing too much water vapor. You will need to apply a specialized moisture-vapor barrier primer after you finish grinding.
Related Article: How to Master Floor Coating Removal
Complete Equipment, Diamond Tooling, and Safety Arsenal
Grinding concrete takes power. You cannot attach a sanding disc to a drywall sander and expect it to profile a garage floor! You need the right machinery for the job.
Choosing the Right Machine: Walk-Behind Grinder vs. Floor Maintainer
When you visit your rental yard, you will usually see two main types of machines:
- Rotary Floor Maintainers (Swing Machines): These look like buffer machines with a single large spinning head. They are lightweight and run on standard 110V household outlets. However, they lack heavy head pressure. They work fine for smooth, soft concrete, but struggle on hard, uneven slabs.
- Planetary Walk-Behind Grinders: These professional machines feature three small heads that spin independently while revolving on a main disc. Planetary grinders stay flat on uneven concrete, creating a smooth surface without leaving gouges.
If you rent a planetary grinder, check its electrical plug! Some powerful rental grinders need a 220V single-phase outlet or a dedicated 20-amp generator. Make sure your home wiring can support the machine before hauling it home.
Diamond Segment Matrix & Grit Selection
The metal blocks that attach to the bottom of the grinding plate hold tiny pieces of synthetic diamonds. Choosing the correct grit size is super easy once you know the basics:
- 16/20-Grit PCD (Polycrystalline Diamond) Segments: Use these aggressive scrapers if your floor has existing latex paint, old epoxy, or thick glue mastics. PCDs scrape off coatings without melting or smearing them across the slab.
- 30/40-Grit Metal Bond Diamonds: This is the absolute gold standard for bare concrete floor prep. A 30/40 grit block removes surface contaminants, flattens minor ridges, and leaves a crisp CSP 2 profile.
- 60/80-Grit Diamonds: These finer grits are used for light cleanup or when preparing delicate decorative stains. Do not use 80-grit as your main pass for high-build epoxy—it leaves the floor too smooth!
Edge Tooling: Angle Grinders & Shrouds
A big walk-behind grinder weighs anywhere from 150 to 400 pounds. Because of its circular shape, it cannot reach the last two inches of concrete right up against your garage walls, steps, or corners.
To handle those spots, you need a handheld 5-inch or 7-inch angle grinder equipped with a diamond cup wheel. Look for a double-row or turbo-segment cup wheel.
To keep dust under control, you must mount a flexible dust shroud over the angle grinder disc. Modern dust shrouds feature a spring-loaded edge cover that flips up so you can grind right flush against wall baseboards.
Silica Dust Control & PPE (OSHA Table 1 Compliance)
Grinding dry concrete creates fine white dust containing crystalline silica. Breathing this fine dust into your lungs is dangerous and can lead to serious respiratory issues.
| Feature | Professional HEPA Extractor | Standard Shop Vac |
|---|---|---|
| Airflow Rating (CFM) | 125 to 200+ CFM | 50 to 90 CFM |
| Filter Type | Certified HEPA (99.97% @ 0.3µm) | Basic Paper Filter |
| Filter Cleaning | Automatic Pulse-Clean | Manual (Clogs Fast!) |
| OSHA Table 1 Compliant | YES | NO |
Do not plug your floor grinder into a regular household shop vacuum! Fine concrete dust clogs paper shop-vac filters within two minutes. Once the filter clogs, dust escapes into your home and neighborhood.
You need a dedicated dust extractor with pulse-cleaning HEPA filtration. These industrial vacuums shake their filters automatically to clear dust while maintaining high airflow (at least 125 CFM).
For personal protection, wear the right gear throughout the job:
- A P100 half-mask respirator (fit-tested to your face).
- Impact-resistant safety goggles.
- Heavy-duty ear defenders (grinders are loud!).
- Steel-toe boots and durable work gloves.
Technical Summary of Core Specs
To keep your floor prep project on track, keep these core specs in mind:
| Prep Metric | Recommended Value / Target |
| Targeted Surface Profile | ICRI CSP 2 to CSP 3 (Sandpaper texture) |
| Primary Diamond Grit | 30/40-grit metal bond (for bare concrete) |
| Secondary Diamond Grit | 16/20 PCD (for removing old paint/mastic) |
| Moisture Test Standard | ASTM D4263 (Plastic sheet test, 24 hours) |
| Dust Extractor Airflow | Minimum 125 CFM with HEPA pulse filter |
| Personal Respirator Standard | P100 half-mask respirator |
Pre-Grind Surface Preparation & Decontamination
Now that you have your equipment, diagnostics, and PPE ready, it is time to prep the job site. You cannot just roll the grinder off the truck and flip the switch!
If you grind directly over grease stains or loose debris, you will end up driving oil deep into the concrete matrix and clogging your expensive diamond segments.
Degreasing Heavy Oil & Chemical Stains
Concrete is extremely porous, absorbing spilled motor oil, transmission fluid, and brake fluid like a hard sponge.
If you run a high-speed diamond grinder over a slick oil spot, the thermal friction melts the oil. The spinning action then smears those hydrocarbons deep into the open pores of the concrete. Epoxy will never stick to an oily surface!
Follow this degreasing protocol before grinding:
- Apply Citrus Degreaser or Microbial Cleaner: Pour a heavy-duty oil degreaser directly onto oil spots.
- Scrub Vigorously: Use a stiff-bristle nylon deck brush to work the cleaner deep into the surface.
- Pull Oil with Poultice: For deep, stubborn oil spots, mix oil-absorbent powder (or cat litter mixed with acetone) into a thick paste. Spread it over the stain, cover it with plastic wrap, and let it sit for 12 hours. As the solvent dries, it draws oil up out of the concrete!
- Rinse and Dry Completely: Mop up the residue with clean water. Let the slab dry for at least 24 to 48 hours before starting your dry grinding process.
Clearing Inclusions and Inspecting Joint Spalls
Take a walk around your garage floor with a flashlight. Look for metal construction debris embedded in the slab, such as:
- Exposed concrete rebar or wire mesh tips.
- Old framing nails, carpet tack strip anchors, or wall bolts.
- Hardened drywall joint compound splatters.
Scrape off drywall mud using a stiff putty knife. For metal bolts or rebar tips, use an angle grinder with a metal cut-off wheel to slice them off slightly below the floor line.
If a diamond grinding segment hits a solid steel bolt at full speed, it can shatter the metal diamond block instantly!
Step-by-Step Guide: How to Grind Your Garage Floor for Epoxy
This is where the magic happens. Turning a slab of concrete into a prepped surface ready for epoxy requires patience, steady footwork, and proper technique.
Step 1: Equipment Calibration & Dust Collection Setup
Before plugging in your walk-behind grinder, set up your vacuum line to run smoothly:
- Connect a 2-inch heavy-duty vacuum hose from your HEPA dust extractor directly to the grinder shroud port.
- Tape the vacuum hose to your power cord using electrical tape every 5 feet. This keeps lines from tangling while you walk.
- Adjust the rubber skirt on the bottom of your grinder shroud. The skirt should sit flat on the floor to trap flying dust without dragging too hard.
- Turn on the HEPA vacuum first, then switch on the floor grinder motor.
Step 2: Executing Main Pass Mechanics (Pattern & Speed)
Operating a floor grinder feels a lot like operating a lawnmower, but you move slower and use deliberate, overlapping patterns.
| Grinding Parameter | Recommended Operating Standard |
|---|---|
| Walking Pace | Slow, steady march (1 to 2 feet per second) |
| Pass Overlap | 30% to 50% overlap on every parallel line |
| Grinding Pattern | Double Cross-Hatch (North-South, then East-West) |
| Machine Weight Bias | Keep head flat; do not lift handle while running |
Start in the farthest corner of your garage and work back toward the open garage door:
- The Sweeping Motion: Move the machine forward in a straight line while swinging the handle gently side-to-side in a 2-foot arc.
- Maintain Pace: Walk slowly. If you move too fast, the diamonds will skip over low spots. If you stop in one spot while the head spins, you will cut an ugly circular dip into your floor!
- Execute Pass 1 (North-South): Grind the entire floor moving back and forth along the length of the garage.
- Execute Pass 2 (East-West): Change direction by 90 degrees. Grind the entire floor again moving across the width of the garage. This cross-hatch pattern eliminates high spots and guarantees a uniform profile across the whole slab.
Step 3: How to Grind Concrete Garage Floor Edges & Tight Corners
Your walk-behind machine will leave an un-ground strip about 2 to 3 inches wide along walls, steps, and posts.
Break out your 5-inch or 7-inch handheld angle grinder attached to your HEPA vacuum:
- Kneel comfortably on thick gel knee pads (your knees will thank you later!).
- Hold the angle grinder flat against the concrete surface. Do not tip the grinder on a sharp edge, or you will dig half-moon gouges into the floor.
- Move the tool in smooth, overlapping circular motions along the wall baseboard.
- Feather the Transition Zone: Overlap your hand-grinded edge into the main walk-behind prepped area by 3 to 4 inches. This creates a seamless blend so you do not see a distinct ridge through your finished epoxy floor!
Step 4: Concrete Crack, Joint & Divot Repair
Once the main floor is prepped, open pores reveal every hidden crack, pop-out, and crumbling expansion joint. Now is the time to patch them up flush!
- Route hairline cracks: Attach a diamond V-blade wheel to your hand angle grinder. Run the blade down hairline cracks to open them into a clean V-shaped channel.
- Vacuum out debris: Clean the routed crack thoroughly with a narrow vacuum tip.
- Fill with 100% Solids Epoxy or Polyurea Filler: Mix a two-part rigid crack filler. Pour it directly into the routed crack until it sits slightly higher than the surrounding floor.
- Grind Flush: After the patch cures hard (usually 2 to 4 hours), run your angle grinder back over the repair to flatten it level with the rest of the floor.
Post-Grind Decontamination & Profile Verification
Congratulations—the dusty work is complete! But hold off on opening those epoxy cans just yet. How you clean up and inspect your floor right now determines whether your installation succeeds or fails.
The Water Drop Penetration Test
How do you know if your concrete pores are open and ready to suck up epoxy primer? Run the simple Water Drop Penetration Test:
Flick a few drops of clean water onto three or four spots around your prepped garage floor (especially where old oil spots used to be). Watch the droplets closely with a timer:
- Pass (Porous): The water droplets flatten out and soak into the concrete within 30 to 60 seconds, darkening the floor like water on a paper towel. This means your pores are open and ready for epoxy!
- Fail (Sealed): The water sits in a tight, rounded bead on top of the concrete for over two minutes without soaking in. This means the concrete is still sealed or contaminated—you need to grind that spot again!
Fine Dust Extraction Protocol
Concrete dust left sitting in pores acts like flour on a baking board—it keeps the epoxy from sticking to the actual stone underneath!
- Vacuum Thoroughly: Vacuum the entire floor using a wide floor-brush attachment. Walk slowly, making two full passes over the room.
- Clean the Edges: Brush out dust trapped under wall baseboards using a stiff hand broom while holding your vacuum nozzle right next to it.
- NEVER Wash with Water: Do not spray your ground floor with a garden hose or pressure washer! Adding water right now pushes moisture back down into the open concrete pores, forcing you to wait days for it to dry out again.
- Dry Solvent Wipe (Optional, but highly recommended): Attach a clean microfiber mop pad to a flat mop base. Dampen the pad slightly with 100% pure acetone. Mop the floor to pick up microscopic dust film. Acetone evaporates in minutes without leaving a trace.
5 Critical Concrete Grinding Mistakes That Ruin Epoxy Floors
Even seasoned DIYers can fall into simple traps when prepping concrete. Avoid these five costly mistakes:
- Using the Wrong Diamond Bond Matrix: Matching hard-bond diamonds with hard concrete glazes the diamond segments smooth. The machine will slide across the floor like an ice skate without cutting into the concrete.
- Dwell-Time Gouging: Stopping the walk-behind grinder while the head is spinning creates circular dips in the floor that show up through thin epoxy coats. Keep moving at a steady pace!
- Overlooking Perimeter Height Matching: Leaving a sharp ridge where the handheld edge-grinding meets the walk-behind main path creates ugly border lines. Always feather your edges smooth.
- Using Low-CFM Standard Shop Vacs: Standard shop vacuums choke on fine silica dust within minutes, blowing cloud remnants back into your garage air. Always insist on a pulse-cleaning HEPA vacuum.
- Washing Ground Floors with Hose Water: Introducing water into freshly prepped pores traps moisture under your new floor coating, leading to bubbling and peeling down the road. Keep your cleanup dry!
Frequently Asked Questions (FAQs)
How long does it take to grind a 2-car garage floor for epoxy?
For a standard 400-to-500-square-foot 2-car garage, actual grinding takes about 4 to 6 hours. This includes making a double-pass with a walk-behind machine, finishing edge work with a handheld angle grinder, and vacuuming up the dust. Plan for a full weekend project if you need to degrease, repair deep cracks, or patch divots.
How much does it cost to rent a concrete grinder and diamond tooling?
Renting a planetary walk-behind floor grinder costs between $150 and $250 per day at most equipment rental yards. Diamond segment rental fees vary—some shops charge a flat daily fee (around $50 to $80), while others measure diamond wear with a caliper (charging around $25 per 1/1000th of an inch used). A HEPA dust extractor adds another $60 to $90 per day.
Can I use a floor sander instead of a diamond grinder?
No. Wood floor sanders or orbital drum sanders do not have the weight or head pressure needed to profile concrete. Sandpaper discs glaze over instantly on hard concrete, leaving the slab smooth without opening the pores. You must use diamond-segment tooling to achieve a proper CSP 2 profile.
What is the difference between wet grinding and dry grinding for DIYers?
Wet grinding uses water to control dust, turning concrete powder into a wet slurry paste. While it keeps dust down, dealing with wet slurry is a messy nightmare for DIYers! You have to scoop up toxic slurry, dispose of it legally, and wait days for the slab to dry out. Dry grinding paired with a pulse-cleaning HEPA dust extractor is cleaner, safer, and allows you to apply epoxy primer immediately after vacuuming.
How do I know if my ground concrete profile is rough enough for polyaspartic or epoxy?
Touch the prepped floor! It should feel like 60-grit sandpaper (CSP 2) for standard high-build epoxy, or 30-grit sandpaper (CSP 3) for thick polyaspartic basecoats. You can also run the water drop test: if a drop of water soaks completely into the stone in under 60 seconds, your profile is ready to go!
Conclusion & Final Action Plan
Taking on a DIY garage floor coating is one of the most satisfying home upgrades you can do. It turns a dark, dusty workspace into a bright, easy-to-clean room that adds real value to your home.
But remember: a great epoxy floor is only as good as the prep work underneath it.
Skipping acid etching and learning how to grind garage floor for epoxy gives your coating a rough surface to grip onto. Diamond grinding opens up concrete pores, removes hidden contaminants, levels out uneven spots, and guarantees a tight mechanical bond that lasts for years.

One response to “How to Grind Garage Floor for Epoxy: The Ultimate DIY Prep Guide”
[…] Related Article: How to Grind Garage Floor for Epoxy […]